
Soldering copper pipe is one of the most useful plumbing skills a DIYer can learn. It lets you create strong, leak-proof joints in water supply lines without calling a plumber. The process involves cleaning the pipe and fitting, applying flux, heating the joint with a propane torch, and feeding in lead-free solder so it flows around the connection by capillary action. Whether you’re installing new plumbing or repairing an existing copper line, this guide walks you through every step clearly and safely.
Quick answer: Clean the pipe and fitting surfaces, apply flux, heat the joint with a propane torch until the flux bubbles, then touch lead-free solder to the joint opposite the flame. The solder melts and flows around the entire joint by capillary action, creating a permanent, leak-proof seal once cooled.
Essential Tools and Materials for Copper Pipe Soldering
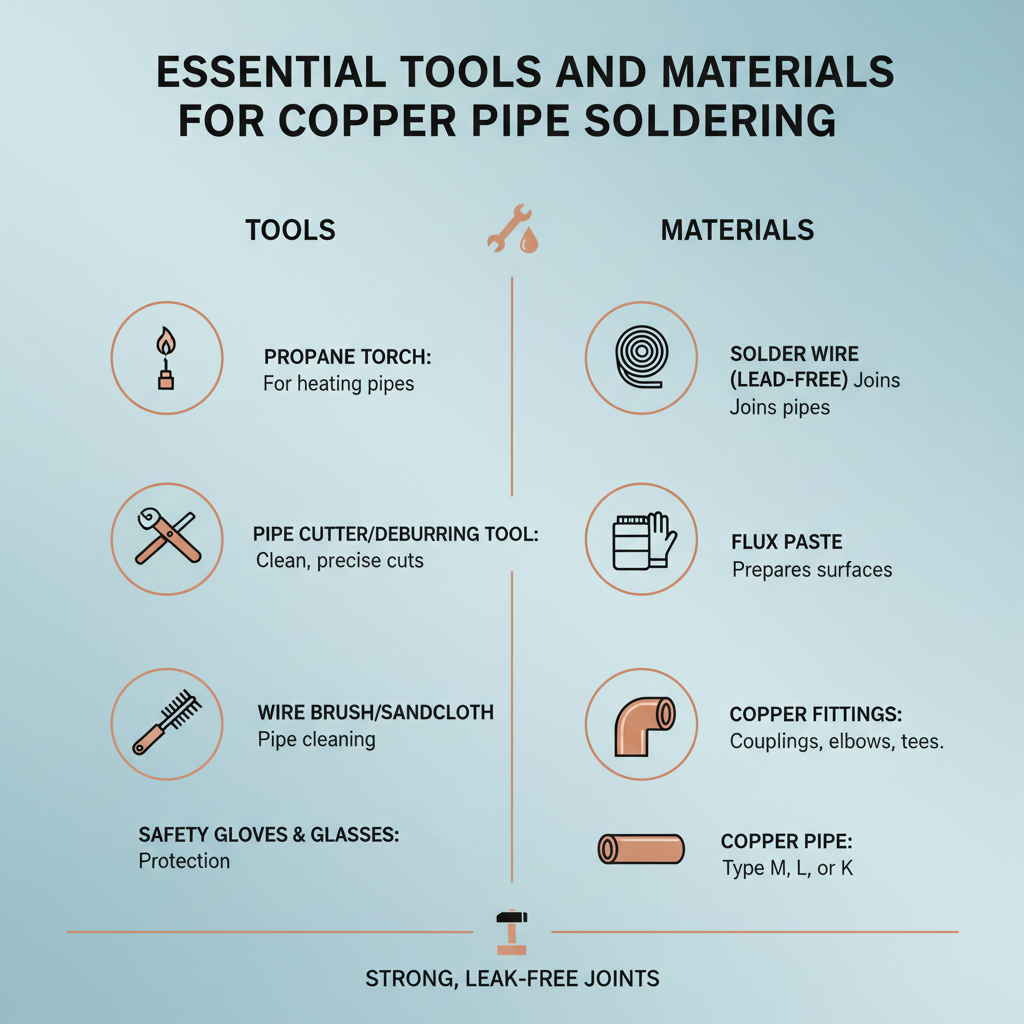
Before starting any soldering project, gathering the right tools and materials is crucial. Having everything ready before you begin prevents rushed work and helps you focus on technique.
Required Tools
- Pipe cutter or hacksaw
- Emery cloth or sandpaper
- Wire brush
- Propane torch with Bernzomatic TS4000 Trigger Start Torch
- Flux brush
- Safety glasses and gloves
- Drop cloth or heat shield
Necessary Materials
- Lead-free solder (95/5 tin-antimony or silver-bearing solder)
- Plumbing flux (paste or liquid)
- Copper pipes and fittings
- Clean rags or paper towels
The quality of your tools directly affects the result. A reliable torch like the Bernzomatic TS4000 Trigger Start Torch provides consistent heat control, which is essential for proper solder flow and joint integrity. A good pipe cutter gives you a clean, square cut that seats properly inside the fitting.
Choosing the Right Solder for Copper Pipe
For any plumbing that carries drinking water, lead-free solder is required by code in the United States. The two most common options are 95/5 tin-antimony solder and silver-bearing solder. Silver-bearing solder flows at a slightly lower temperature and produces stronger joints, making it a good choice for beginners. Avoid using electrical solder, which contains rosin flux and is not rated for plumbing use.
Preparing Copper Pipes and Fittings
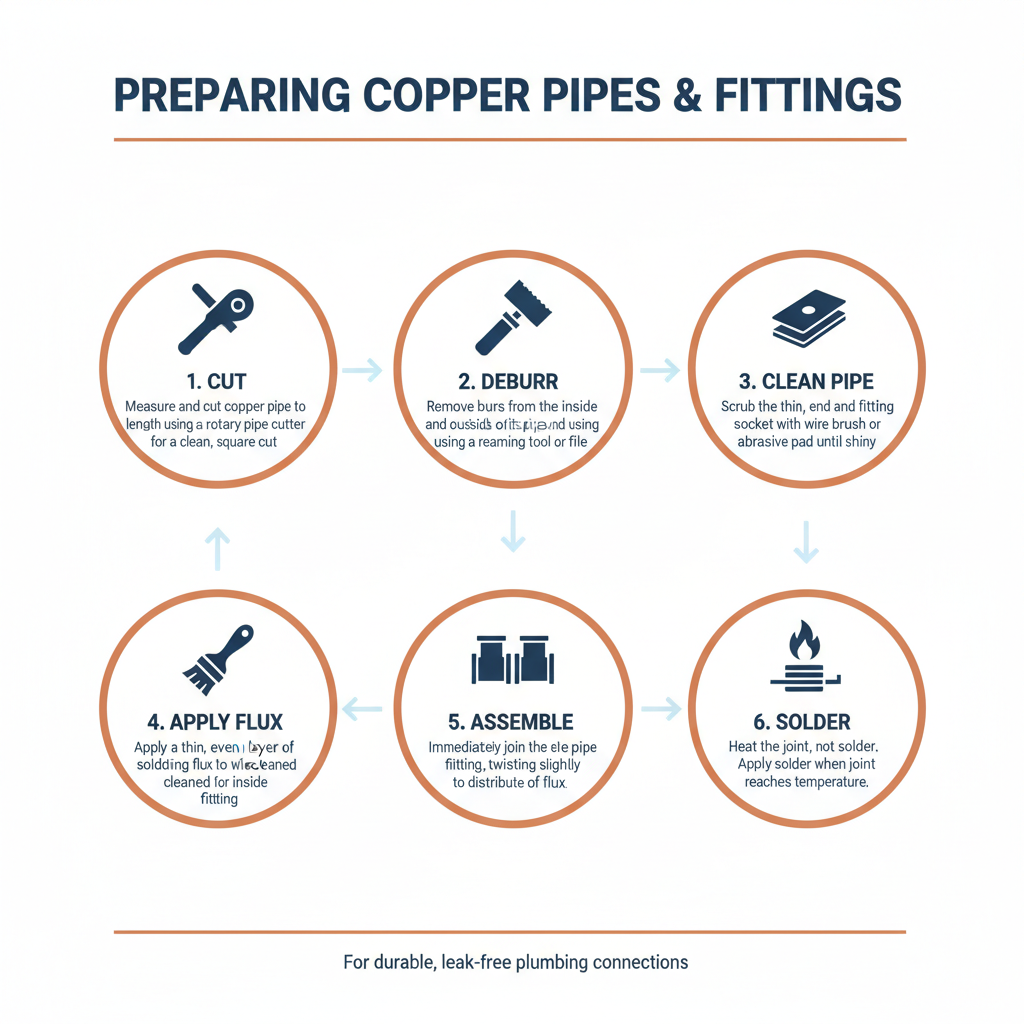
Proper preparation is the foundation of a successful solder joint. Clean, well-fitted surfaces ensure the solder bonds correctly and the connection holds up for decades.
Cutting Pipes to Size
Measure and mark your copper pipe accurately before cutting. A pipe cutter produces the cleanest, squarest cut — rotate the tool around the pipe while gradually tightening the cutting wheel with each pass. If you use a hacksaw, take care to cut straight and perpendicular to the pipe.
After cutting, remove any burrs from inside and outside the pipe using a reaming tool or file. Burrs restrict water flow and create weak points at the joint.
Cleaning the Joint Surfaces
Clean the outside of the pipe end and the inside of the fitting socket using emery cloth or fine sandpaper. Remove about one inch of oxidation and discoloration from the pipe end. The copper should look bright and shiny when it’s properly prepared.
Use a wire brush sized for the fitting to clean the interior socket. This step is called “brightening” and it ensures the solder will actually bond to the copper rather than sitting on top of an oxidized layer.
Test Fitting Components
Before applying flux, dry-fit all pipes and fittings. The pipe should slide into the fitting easily but without play. It should insert fully into the fitting socket — typically about 5/8 inch for standard fittings.
Mark the insertion depth with a pencil on the pipe. This mark helps you confirm the pipe is fully seated during final assembly before soldering.
Applying Flux and Assembling Joints
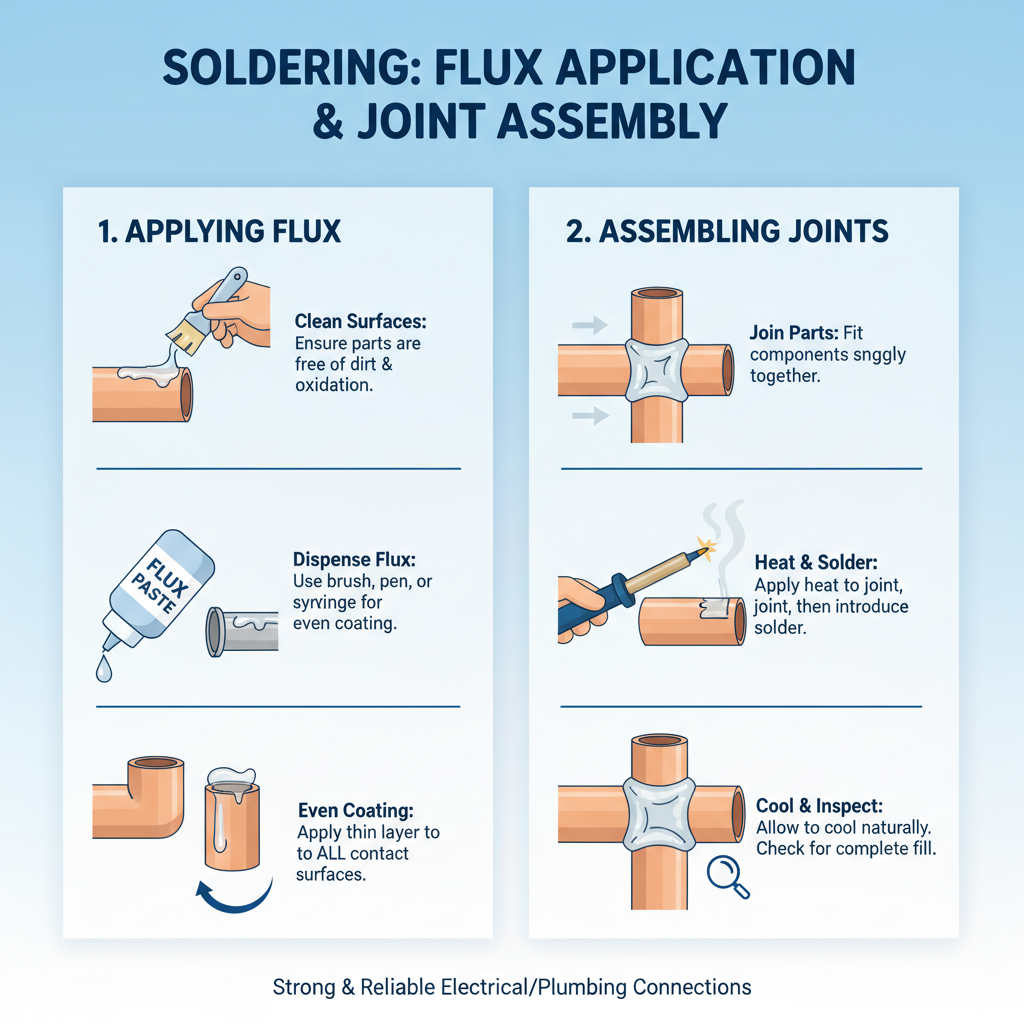
Flux is a chemical cleaning agent that prevents oxidation while the copper is being heated and helps solder flow evenly into the joint. Skipping flux or applying it unevenly is one of the most common reasons beginners end up with leaky joints.
Flux Application Technique
Using a flux brush, apply a thin, even coat of plumbing flux to both the cleaned pipe end and the fitting interior. Cover all surfaces that will be inside the joint. Too much flux can cause splattering and corrosion; too little leads to poor solder flow.
Work quickly after applying flux. It begins acting immediately to keep the copper surface clean, but you should assemble the joint within a few minutes for the best results.
Joint Assembly
Insert the pipe fully into the fitting with a slight twisting motion to distribute flux evenly across both surfaces. Confirm the pipe reaches your pencil depth mark. Wipe away any excess flux that squeezes out onto the exterior — residue left on the pipe surface can cause corrosion over time.
When working on multiple joints at once, assemble them all before lighting the torch and work systematically from one end to the other to avoid disturbing completed joints.
The Soldering Process: Heat and Solder Application
This is the step where preparation pays off. Careful heat control and correct solder application are what separate a solid, lasting joint from one that leaks under pressure.
Heating the Joint
Light your propane torch and adjust to a steady blue cone flame about 1–2 inches long. Start heating the fitting body first, since it has more mass than the pipe and takes longer to reach soldering temperature.
Move the flame in a circular motion around the joint, heating both the fitting and pipe end evenly. Aim to concentrate about 60% of the heat on the fitting and 40% on the pipe. The joint is ready when the flux begins to bubble and sizzle — that’s your signal to apply solder.
Applying Solder
Remove the flame slightly and touch the tip of your solder wire to the joint on the side opposite where you were applying heat. At the correct temperature — around 400–500°F — the solder will melt on contact and immediately draw into the joint by capillary action.
Feed solder around the full circumference of the joint. For a standard 1/2-inch joint, you’ll use roughly 3/4 to 1 inch of solder wire. You’re looking for a small, even fillet of solder to appear all the way around the joint edge.
Recognizing Proper Solder Flow
A well-soldered copper joint shows these characteristics:
- Solder flows completely around the joint with no gaps
- A small, even fillet is visible at the joint edge
- No voids, cracks, or dry spots
- A smooth, shiny surface once cooled
Remove heat the moment solder has flowed completely around the joint. Continuing to heat after that point can burn away the flux, cause the solder to run out, or damage the fitting interior.
Cooling and Testing Your Soldered Joints
A properly soldered joint still needs time to set and should be tested before the system goes into service. Rushing either step can result in leaks you won’t discover until water is flowing through the pipe.
Cooling Process
Allow joints to cool naturally. Do not move, bump, or stress the pipe for at least 30 seconds after soldering. Quenching a hot joint with water can cause stress fractures in the solder, creating a joint that looks fine but fails later under pressure.
Once the copper has cooled enough to touch safely, wipe away any remaining flux residue with a damp rag. Flux left on the pipe surface will cause corrosion over time.
Pressure Testing
Before putting your plumbing system into service, pressure test all new joints. Close all valves, fill the system with water, and inspect each joint carefully for droplets or moisture around the solder connection.
For new installations, consider using Oatey No. 5 Paste Flux during your next project, as it provides excellent cleaning action and helps achieve consistent results across multiple joints.
Hold the system at full pressure for at least 15 minutes. Small weeping leaks may not show up immediately, so giving it adequate time before closing up walls or cabinets prevents costly repairs later.
Common Soldering Mistakes and How to Fix Them
Most soldering problems come down to a handful of recurring mistakes. Knowing what to look for makes troubleshooting faster and helps you avoid repeating the same errors.
Insufficient Heat
Underheated joints produce weak connections and are a leading cause of leaks. Signs include:
- Solder balls up on the surface instead of flowing in
- Incomplete coverage around the joint
- Dull, grainy solder appearance once cooled
Solution: Apply more heat and make sure both the pipe and fitting reach proper temperature before touching the solder to the joint.
Overheating Problems
Too much heat is just as damaging as too little:
- Flux burns off before solder can be applied
- Solder runs out of the joint rather than filling it
- The fitting socket can be damaged internally
Solution: Use a steady, moderate flame and remove the torch as soon as solder flows completely around the joint.
Contaminated Surfaces
Oil, oxidation, or moisture on the pipe or fitting will prevent solder from bonding properly:
- Solder won’t wet the copper surface
- Uneven or patchy solder flow
- Weak joint strength that may hold initially but fail over time
Solution: Re-clean all surfaces thoroughly with emery cloth and apply fresh flux before attempting to solder again.
Movement During Cooling
Moving the joint before the solder solidifies creates internal cracks:
- Hairline fractures in the solder
- Immediate or delayed leaks under pressure
- Joints that appear visually sound but fail during testing
Solution: Support pipes so they cannot shift, and avoid touching or stressing the joint for at least 30 seconds after soldering.
Moisture in the Pipe
Water or moisture inside the pipe during soldering is one of the trickiest problems beginners encounter. Even a small amount of water turns to steam when heated, which prevents the joint from reaching soldering temperature and causes solder to blow out of the fitting.
Solution: Drain the pipe system completely before soldering. If residual moisture is present, use a bread plug — a small piece of white bread pushed into the pipe — to temporarily absorb remaining water. It will dissolve harmlessly once the system is filled. For more detail on this specific situation, see our guide on how to solder copper pipe with water in it.
Safety Considerations and Best Practices
Working with an open flame near plumbing — often inside walls, under floors, or in tight spaces — requires consistent attention to fire safety and personal protection throughout the job.
Fire Safety
- Keep a fire extinguisher nearby and know how to use it
- Use a flame shield or heat-resistant mat behind joints near wood framing or joists
- After finishing, check the surrounding area carefully for any smoldering materials
- Ensure adequate ventilation when soldering in enclosed spaces
Personal Protection
- Wear safety glasses to protect against flux spatter
- Use heat-resistant gloves when handling hot pipes and fittings
- Work in a well-ventilated area to avoid inhaling flux fumes
- Keep basic first aid supplies accessible when working with open flame
Lead-Free Solder Requirements
Modern plumbing codes require lead-free solder for all potable water systems. This applies to both new installations and repairs on existing lines that carry drinking water. Using leaded solder on drinking water pipes is a code violation and a health risk. Always confirm your solder is labeled “lead-free” and meets NSF/ANSI 61 standards before using it on any water supply line.
Frequently Asked Questions
How long does it take to solder a copper pipe joint?
The actual soldering takes about 30–60 seconds per joint once you’re set up. Preparation — cutting, cleaning, and fluxing — takes a few minutes per joint. Allow at least 30 seconds of undisturbed cooling before moving on.
Can I solder copper pipe without flux?
No. Flux is essential for copper pipe soldering. Without it, the copper oxidizes as soon as it’s heated and the solder will not bond properly. Always use a plumbing-grade paste or liquid flux rated for use with lead-free solder.
What type of propane torch is best for soldering copper pipe?
A standard propane torch with an adjustable flame is sufficient for most residential copper pipe sizes up to 3/4 inch. For larger diameter pipe — 1 inch and above — a MAPP gas torch delivers higher heat output and speeds up the process. The Bernzomatic TS4000 Trigger Start Torch is a reliable and widely available option for typical plumbing work.
How do I fix a leaking soldered copper joint?
Drain and dry the pipe completely, then heat the joint with your torch until the solder melts and you can separate the fitting. Clean both surfaces again with emery cloth, apply fresh flux, reassemble, and re-solder. Trying to add solder over a leaking joint without fully reheating and reflowing it rarely works long-term.
Is it difficult to solder copper pipe as a beginner?
Soldering copper pipe has a short learning curve. The most important habits to develop are thorough surface cleaning, using enough flux, and reading the heat correctly before applying solder. Most beginners can produce reliable joints after a few practice runs on scrap pipe before working on a live system.