
Getting a MIG weld that looks clean, holds strong, and passes visual inspection isn’t just about running a bead and hoping for the best. It takes the right settings, technique, and understanding of what a good weld actually is.
A perfect MIG weld has consistent width, smooth ripples, full fusion at both edges, and no visible porosity, cracks, or undercut. It’s slightly convex or flat in profile, with uniform bead width from start to finish. Achieving it requires correct voltage, wire feed speed, travel speed, and shielding gas flow working together — not any single setting on its own.
What a Perfect MIG Weld Actually Looks Like
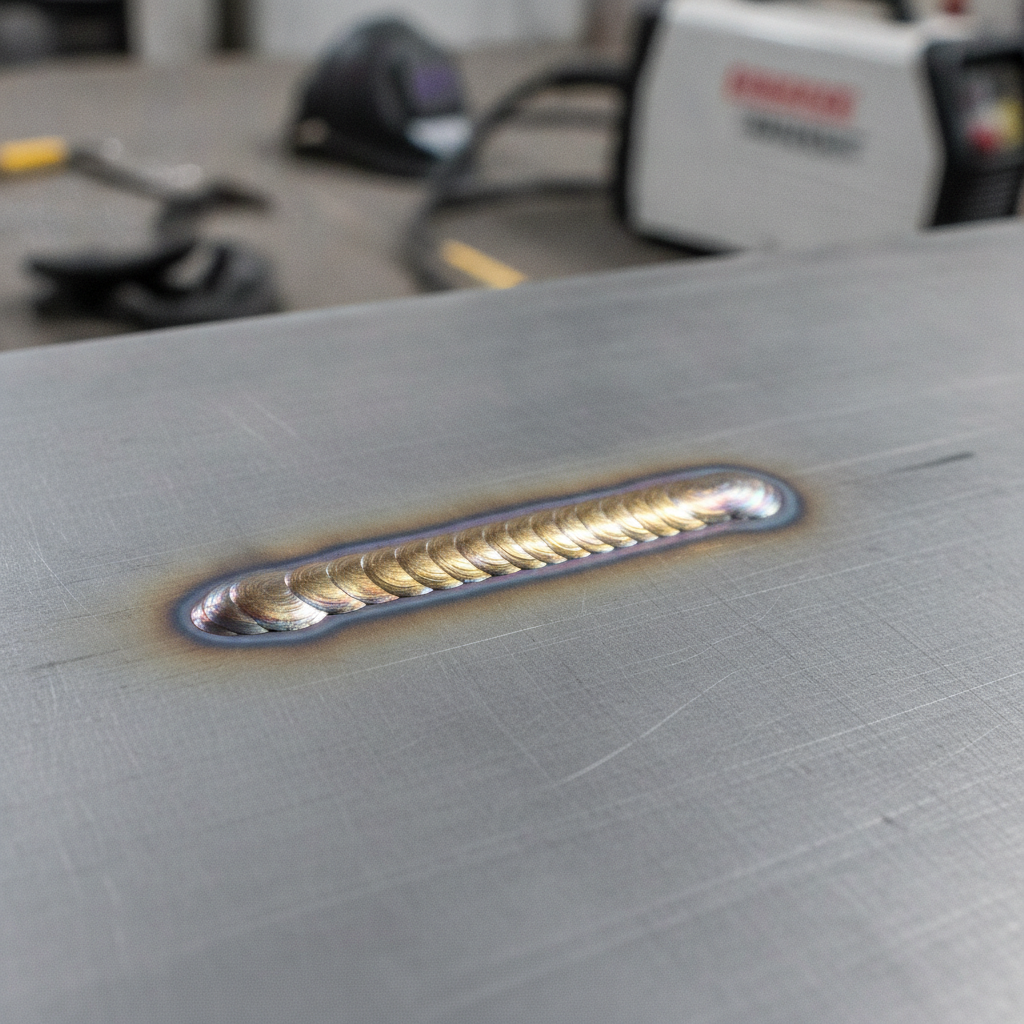
Before chasing perfect settings, it helps to know exactly what you’re aiming for visually.
A correctly laid MIG bead should have:
- Uniform width from start to finish — no wide spots or narrow pinches
- Smooth, evenly spaced ripples that look like stacked dimes or gentle waves
- Flat to slightly convex profile — not high and ropey, not recessed below the base metal
- Clean tie-in at both toes — the edges where the weld meets the base metal should blend smoothly without undercut
- No surface porosity — holes, pits, or bubbles indicate shielding gas or contamination issues
- Consistent color — on mild steel, a clean bead typically appears with a light grey or silvery surface; on stainless, slight golden or straw tones near the heat-affected zone are acceptable
A weld that looks perfect visually but has cold laps or lack of fusion underneath is still a bad weld. Good appearance is a strong indicator of quality, but it must be backed by proper heat input and penetration.
The Four Variables That Control Weld Quality

MIG welding quality is controlled by four interlocked variables. Changing one always affects the others.
| Variable | Effect on Weld |
|---|---|
| Voltage | Controls arc length and bead width |
| Wire Feed Speed (WFS) | Controls amperage and deposition rate |
| Travel Speed | Controls bead size and heat input per inch |
| Shielding Gas Flow | Protects the puddle from oxidation and contamination |
Voltage too high: Wide, flat, spatter-heavy bead. Arc becomes erratic.
Voltage too low: Narrow, ropey bead. Wire stubbing into the puddle.
WFS too high: Burn-back, excessive spatter, loss of arc control.
WFS too low: Weak, cold bead with poor fusion. Possible wire burning back to tip.
Travel speed too fast: Narrow, undercut bead with poor fusion.
Travel speed too slow: Wide, convex bead with excess heat buildup and possible burn-through.
Most MIG welders use DCEP (direct current electrode positive), which concentrates heat at the workpiece for proper fusion — getting polarity right is the starting point before adjusting anything else.
Shielding Gas Setup for a Clean Bead
Shielding gas is one of the most overlooked factors when chasing a perfect bead. Even with ideal machine settings, the wrong gas or incorrect flow rate will ruin surface quality.
For mild steel, 75% Argon / 25% CO2 (C25) is the standard choice. It produces a smooth arc, minimal spatter, and good bead appearance. Pure CO2 welds hotter and deeper but creates rougher, spatter-heavy beads — it’s better suited for structural work where appearance matters less.
For stainless steel, a tri-mix gas (90% Helium / 7.5% Argon / 2.5% CO2) or 98% Argon / 2% CO2 is typically used to preserve corrosion resistance and control heat. You can find a full breakdown of gas selection by material in this MIG welding shielding gas selection guide.
Flow rate also matters. Most shop setups run 15–25 CFH (cubic feet per hour) or roughly 7–12 litres per minute at the regulator. Too little gas causes porosity. Too much creates turbulence that pulls atmospheric contamination into the puddle — which also causes porosity.
How to Set Up for the Best Possible Bead
1. Prepare the Base Metal
Clean metal welds clean. Remove mill scale, rust, paint, oil, and galvanizing from the weld zone and at least one inch back on both sides. A flap disc or angle grinder works well for this. Contamination is responsible for more porosity and poor fusion than most beginners realize.
2. Dial In Your Settings for Material Thickness
Use the manufacturer’s settings chart on your welder as a starting point. As a general reference:
| Material Thickness | Voltage (approx.) | Wire Feed Speed (approx.) |
|---|---|---|
| 18 gauge (1.2mm) | 15–17V | 150–200 ipm |
| 1/8 inch (3.2mm) | 17–19V | 200–250 ipm |
| 1/4 inch (6.4mm) | 20–22V | 280–350 ipm |
| 3/8 inch (9.5mm) | 22–25V | 350–420 ipm |
These are starting points. Fine-tune from there by running test beads on scrap of the same thickness and material.
3. Set Your Contact Tip-to-Work Distance (CTWD)
CTWD — the distance from the end of the contact tip to the workpiece — directly affects arc stability. For standard MIG welding, maintain 3/8 to 5/8 inch (10–15mm). Too long and voltage drops; too short and you risk spatter buildup in the nozzle and erratic arc behavior.
4. Hold the Correct Gun Angle
- Drag angle (forehand): 10–15° push toward the direction of travel. This gives better visibility and slightly flatter bead profiles.
- Push angle (backhand): 10–15° lean away from direction of travel. Produces deeper penetration, useful on thicker material.
For most general MIG welding, a 5–15° drag angle produces the most consistent results.
5. Maintain Consistent Travel Speed
This is where most inconsistent beads come from. Move too fast and the bead narrows and loses fusion. Move too slow and you’re adding too much heat, creating a wide, convex bead that may burn through on thinner sections.
Practice on scrap until you can maintain a consistent speed that keeps the arc about 1/4 to 3/8 inch ahead of the leading edge of the puddle.
Reading Your Bead: What the Weld Tells You
Every bead is feedback. Learning to read what went wrong — or right — speeds up your improvement significantly.
Porosity (holes or pits): Shielding gas issue, contamination, or rust on the base metal. Check flow rate and clean your material.
Undercut (groove along the edge of the bead): Voltage too high, travel speed too fast, or gun angle too steep. Reduce voltage slightly or slow your travel.
Overlap (bead lying on top of base metal without fusing): Voltage too low or travel speed too slow. Increase voltage or speed up.
High, ropey bead: Wire feed speed too high relative to voltage. Increase voltage or reduce WFS.
Excessive spatter: Voltage too low, bad shielding gas coverage, or contaminated base metal.
If you’re regularly running into arc issues and can’t identify the root cause, reviewing common MIG welding problems and their fixes can help narrow it down systematically.
Technique Patterns: Stringer Beads vs. Weave Patterns
Most code-compliant and structural welding specifies stringer beads — straight, narrow passes with no side-to-side motion. They produce more consistent fusion and less heat distortion.
Weave patterns (zigzag, C-motion, or figure-eight) are useful for:
- Filling wide gaps
- Building up material in a groove
- Covering multi-pass welds
On thin metal, avoid weaving entirely. The added heat input dramatically increases distortion and burn-through risk. For working on thin-gauge steel, the techniques used to MIG weld thin metal without burning through are directly relevant here.
Common Mistakes That Ruin Otherwise Good Welds
- Skipping base metal prep. Even a thin layer of mill scale causes porosity and poor fusion. It’s always worth the extra five minutes.
- Using the welder’s factory default settings without adjusting. Factory charts are starting points, not final answers. Always run a test bead on scrap first.
- Incorrect gun angle. Holding the gun too steep creates undercut and poor tie-in. Stay within 15° of vertical for most positions.
- Rushing travel speed. Especially when you’re trying to avoid burn-through, the instinct is to speed up — but inconsistent speed creates inconsistent bead width.
- Not checking wire stickout. Excess stickout is one of the most common setup errors. Most welders don’t notice it until the weld looks cold and the arc sounds rough.
In practice, machines like the Lincoln Electric PRO MIG 180T have sync settings that help beginners find a starting point quickly, but fine-tuning by ear and eye still matters regardless of the machine.
What Proper Penetration Looks Like on a Test Piece
Cut a test bead across its width with a cutoff wheel and grind the face smooth. A properly penetrated bead should show:
- Full fusion at both toes — no cold lap or boundary line
- Penetration into the base metal — typically 30–100% of base metal thickness depending on application
- No internal porosity — no voids visible in the cross-section
This macro test is the most reliable check for weld quality that visual inspection can’t fully reveal. For structural or load-bearing applications, it’s worth doing regularly when setting up for a new job or material thickness.
FAQ
What does a perfect MIG weld sound like?
A well-tuned MIG weld produces a steady, consistent crackling sound — often described as bacon frying in a pan. An erratic, sputtering, or popping sound usually indicates voltage or wire feed speed that’s out of balance. If you hear a loud buzzing or repeated wire stubs, voltage is likely too low for the wire feed speed you’re running.
Why does my MIG bead look good on top but have no penetration underneath?
This is usually a sign of voltage that’s too low or travel speed that’s too fast. The arc deposits filler metal without properly fusing into the base material, creating what looks like a clean bead but is actually sitting on top of the joint. Run a cross-section test to verify penetration whenever this is a concern.
How do I get the stacked dime look on MIG welds?
The stacked dime appearance comes from a consistent rhythm in travel speed and a slight pause at the edges of your weave pattern. It’s easier to achieve with TIG welding due to manual wire feeding, but with MIG you can approximate it using a very slight C-motion or by practicing extremely consistent travel speed. Clean base metal and proper settings make it significantly easier.
What wire diameter should I use for clean MIG welds?
For most general fabrication on mild steel between 18 gauge and 3/16 inch, 0.030 inch (0.8mm) ER70S-6 wire is the most versatile choice. For material over 1/4 inch, 0.035 inch wire handles the increased deposition demand. ER70S-6 includes deoxidizers that tolerate light surface rust and mill scale better than ER70S-3, making it the preferred wire for clean general-purpose work.
Can I get a perfect weld without a shielding gas regulator?
No. A regulator is essential for controlling flow rate. Without accurate flow control, you’re guessing — and porosity from either too little or too much gas is almost guaranteed. Even flux-core welding, which doesn’t require external shielding gas, still needs consistent technique to protect the puddle using the flux within the wire. If gas flow rate is something you’re still calibrating, reviewing correct shielding gas flow rates for MIG welding is a practical next step.
Does travel direction affect weld quality in MIG welding?
Yes. Pushing the gun (forehand) produces a flatter, wider bead with shallower penetration and better visibility. Pulling (backhand) gives slightly deeper penetration and a narrower bead. For thin material, pushing is generally preferred. For thicker material or root passes, pulling gives better fusion. Neither is universally better — both have appropriate applications.
How do I know if my MIG weld is strong enough?
A weld’s strength depends on penetration, fusion, and proper sizing for the load it carries. Visual inspection alone isn’t sufficient for structural work. Determining the correct weld size for the application is the first step, followed by cross-section testing on practice pieces to verify actual penetration depth before committing to production welds.
A perfect MIG weld isn’t one miraculous bead — it’s the repeatable result of clean metal, correct settings, consistent travel speed, and the discipline to run test beads before production work. Get those four things right, and the quality follows naturally. Most welders who struggle with consistency aren’t making one big mistake — they’re making several small ones at the same time, which is why systematic troubleshooting always beats random adjustments.